Who doesn’t endear a lush, green lawn attached to their property? We bet everyone would raise their hands.
But it’s quite a task to sow seeds and wait for the hearty grass to emerge. Rather install sods and get a healthy, green, thriving lawn with minimal effort, instantly.
Before you jump from the chair, hold on! Installing sod is an art! And you need to be extra careful when installing turf (sod), or else all your efforts will go in vain.
In this blog, we’ve got for you the most quintessential tips for sod installation from the experts of Soil and Seed Landscaping NY – and we’re sure our tips will let you enjoy a gorgeous green lawn in no time.
5 Invaluable Tips for Sod Installation
1. Test The Soil
The first piece of advice for sod installation is to check the soil’s composition before sodding. To support the growth of grass, you’ll need fertile and well-drained soil. A tightly packed soil suffocates the grass due to a lack of oxygen.
To carry out the soil test, dig a hole in your yard and fill it with water. If it drains quickly, the soil is sandy. But if it takes time to drain, the soil is clay-packed. You have to add organic compost to it to make it fertile.
Test the pH level of the soil too. If it’s too acidic or alkaline, you can easily make it right with lime and gypsum.
2. Clean The Yard
The next tips for sod installation are to prepare the soil for sodding. For that, you have to clean your yard. Clear all the dirt and debris with a rake. Make sure there are no weeds in it before you lay down the sod.
If there is any construction material lying around in the area, remove it. Also, level down the uneven patches with a shovel.
3. Spread Organic Compost and Fertilizers
Spread a 2- or 3-inch-thick layer of compost or topsoil in the sodding area. This will help the soil to retain all the moisture and nutrients. Mix the compost with the soil with a tiller.
Experts also recommend laying down high-quality and phosphate-rich fertilizer in the ground.
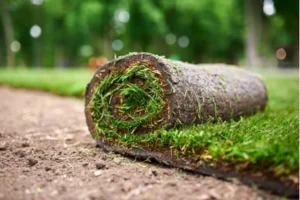
4. Lay the sod
Your garden is all set for sod grass installation. Make sure to bring in the sod on the very day of installation. Storing the turf will highly affect the quality of it.
To begin the installation, lightly water the garden soil and then lay the sod along the length of your lawn. Start from one edge of the garden and then slowly move to the other end. Make sure it’s properly aligned with the edges of the yard.
No patch should be left exposed. To fill up any small gaps, use a box cutter to cut short pieces of sod.
5. Maintenance of Sod
Now that you’re done sodding, take good care of it to keep the turf in good shape. Water the new sod every morning and evening for the first 7-10 days. Continue this step until new roots begin to emerge.
After 1 week, look for root growth. To do that, lift a corner of sod and inspect the roots. Remember you’re looking for new white roots.
Once you notice that, you can change the watering schedule. Then, gradually increase the time between watering.
DIY sod installation looks easy but isn’t!
You can follow the aforementioned tips and lay down the sod yourselves. But you won’t get neat and seamless results like experts Soil and Seed Landscaping NY can provide. Renowned as the top-rated sod installation service in Clarence, our professional landscapers have the expertise, tools, and knowledge to carry out each stage of the new sod installation with efficiency, care, and love
Read this article also to get more tips for sod installation – How to Avoid the Sod Installation Mistakes