
You are thinking of installing a paver patio at home.
Yes, when done right, it can transform your property and accentuate the value of your home instantly.
To top the list, paver patios are low maintenance, too!
However, doing a DIY paver patio can be a bit difficult if you don’t know the correct steps.
Measurements, the depth of the ground level, edging – among other things that you’ll have to learn before starting your DIY paver patio.
Also, removing and replacing old paver patios is a challenge in itself. Though you always have the affordable paver patio installation Clarence services available – but it’s still good to know and understand the basics.
We are here to help!
NOTE: Before you start building your DIY paver patio, we recommend gathering all the tools and materials that you’ll need. This can literally make or break the whole project.
Important Read: Step-By-Step Guide To Install A Sturdy Paver Patio
DIY Paver Patio Installation
Step 1: Plan The Paver Area
Start by measuring the size of the patio area with a garden hose, paint, or string. Measure the width and the length of the area to find out how much materials you will need. Then, divide the square footage of your patio with the square-foot coverage of each panel to determine the number of panels you will need.
PRO TIP: Try to build the patio base 1 foot longer and wider than the size of the finished patio – so that it extends 6 inches beyond the paving on all sides.
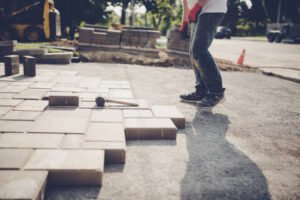
Step 2: Excavate The Paver Patio Area
The next step is to excavate the grasses and other vegetation from the area and skim off at least 2 to 4 inches of soil.
If you need help with digging, you always have the professionals of Soil and Seed Landscaping available.
If you are doing the work on your own, make sure the ground is uneven and there is no thick layer of gravel. Try to use a plate compactor to tamp down the soil.
Step 3: Roll Out The Fabric
Once the paver area is flat and evenly distributed, the next step is to add a landscape fabric over the tamped soil.
This fabric will prevent the sand from mixing with the soil. Always overlap the adjoining pieces of fabric and then push the staples through both pieces and into the ground.
PRO TIP: Use non-woven fabric because woven landscape fabric isn’t very porous and can trap water under your patio.
Step 4: Add The Sand Bed
Keeping an average depth of ¾ inches, spread the layer of the sand. Flatten the sand and level it with the ground. Also, check the slope of the paver patio base panels.
TIP: You may be doing a DIY paver patio to save some money, but make sure not to use sandbox sand. They are too fine. Use all-purpose or fill sand.
Step 5: Lay Paver Mat Panels On Leveled Sand
Lay the paver base panels over the sand, weaving them in a way that avoids continuous seams.
NOTE: If you have stones that vary in thickness, use a layer of sand over the panels to make sure the stones are leveled.
Step 6: Install Paver Edging
Position the paver edging to the paver mats and ensure they are carefully aligned with the layout strings.
Step 7: Install The Pavers
As you would do over a conventional gravel base, do the same with the pavers. This will protect the screeded sand, and you’re unlikely to mess it up as you work.
Important Read: Paver Patio Installation: The Pros and Cons of Paver Patios
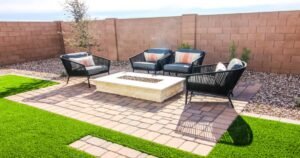
Planning To Transform Your Outdoor Space With a Paver Patio?
A well-designed paver patio can completely remold your outdoor aesthetics – provided they are flat, completely leveled, and finished off correctly. It’s natural to feel all inspired and get to work – but you will need your patience because it will take time.
Anytime you need paver patio installation services in Clarence at competitive rates, Soil, and Seed Landscaping paving professionals are just a call away. You can discuss with us your paving needs, and we will help you choose the best solution for your property and needs.